"Grout is your friend." My motto! Grout color is super important and is a common question people ask me with regard to their project. Your grout color should pull everything together and not interfere with your design. Here's what I learned from other experts: white grout fractures, black intensifies, and gray blends. So choosing your color depends on the effect you are going for.
White grout is great for white broken dishes and areas that you want to keep a bright white color. However, any errors you make are accentuated by white. Black works well when you use lots of bright colors in a mosaic but it can also overpower your piece, and gray is always a safe choice. Not easy to choose, huh? If you are unsure of which color, sprinkle some dry grout powder into your mosaic and see if you like it. After you decide, you can then brush it out. Remember, the color you see when it is a dry powder is the color it dries back to.
I recommend using sanded grout with polymers as they help strengthen your mosaic. Mapei, Laticrete, are two brands that are good, but there are more as well. Check with your local home improvement stores like Lowe's and Home Depot, etc...
When you mix your powdered grout, start with a tiny amount of water in the bottom of your container, then slowly add the powder. A little water goes a long way! Keep adding both until you obtain that "peanut butter" consistency. After you mix your grout, let it sit for about 5-10 minutes so the chemicals will have time to work.
If possible, try to buy a grout that is already the color you like. If you can't find one, I recommend Tints-All. It is a colorant that is very concentrated and a few drops added to your white or grey grout will provide a nice, rich color. You won't achieve this with adding acrylic paints.
After you have spread your grout (using a float or your gloved hand, or other spreading device) on your piece and removed the excess, let it sit a few minutes. Then I recommend using the dry-method to clean your mosaic. Using clean, dry rags, gently wipe the tops of your tesserae, while moving your rag to a clean spot so you don't "drag" the grout around. Continue this process until you have a nice, clean mosaic. Let it sit for 24 hours, then wipe with a wet cloth or sponge. If you see any grout "haze" use vinegar and water and lightly rub on top to remove the haze and shine up the tiles.
Grout really is your friend – it pulls your colors together, hides flaws, and creates a long-lasting work of art. If you want to see me doing it, there are some inexpensive videos you should check out here.
In my free book, "2022 Mosaic Handbook" I have a section in there about adhesives. I thought I'd add it here in my blog for those of you who don't have this handbook.
There are a myriad of adhesives that are used in mosaics. Some glues work well on certain backers while other glues could be harmful to a particular backer. Everyone has favorites and there are differing opinions on what works. So, here is a general overview for you, and I recommend if you aren’t sure, experiment on a small piece before you use it on your project.
White Craft Glue (I use Weld bond), is great for indoor projects. You can use it for gluing glass, vitreous tiles, and many more materials. It is also used in sealing porous backers, just mix 1/2 water and 1/2 weld bond and brush over backer, like a terracotta pot. It dries clear, is easy to work with and clean up.
Weld Bond can be used on acrylics, glass, mesh, Hardie backers, MDF, wood, stones, Skeewbackers, Wedi board, styrofoam, terracotta, and more. Weld bond comes in plastic bottles that are easy to work with. You can just squeeze some onto the back of your tile and then press the tile down to the backer. Or you can spread some weld bond onto an area of your backer using a Kraft stick or something similar, then lay your tiles into the glue. Be sure not to use so much that it oozes up and fills in where you need grout to go. Clean out any excess glue with a sharp tool.
Thin set (mortar) is what I use for almost all of my outdoor projects or for mosaics exposed to wet areas. You can use thin set on just about any tile, glass, found objects, smalti, marble, dishes, etc. It is a little more challenging to work with as you need to control the amount you use so it doesn't interfere with your grout lines. It comes in powder or pre-mixed. You can add colorant to it and use it for both your adhesive and your grout. Be sure not to use so much that it oozes up and fills in where you need grout to go. Thin set can be used on plywood, mesh, brick, cement, concrete, Hardie backer, MDF, wood, Kerdi board, Wedi board, Skeewbackers, stucco, styrofoam, terracotta, textiles, to name a few.
Epoxies - For metal surfaces, neutral cure and water-resistant silicone, epoxies, PL500 construction glue can be used. Some epoxy is a 2-part adhesive and has strong fumes, so work in a ventilated area or wear a mask. Do not use any cement-based adhesives like thin set with metals as any rust from the metal may break down thin set and grout.
Clear Silicone Adhesives - These works well for glass on glass. It is clear and waterproof.
Mirror Adhesive - Mirror adds great shine and reflectivity to mosaics and is fun to have in your art. You should use a glue specifically made for mirror to glue it down. Make sure it states it is for mirrors. Do not use white craft glue or thin set, as in time it will eat away the silver backing leaving a black spot. I learned this lesson the hard way.
E6000 - This is a glue used a ot in jewelry making. It can work in mosaics as well, only never, ever use it around any kind of foam core boards or styrofoam, as it can melt it. So do not use it with Skeewbackers, Wedi board or Kerdi boards which have foam core centers. There are some fumes from it, so work in a ventilated area or wear a mask.
MacGlue - I’ve never used it but lots of mosaic artists love it. It is a white glue that works similar to weld bond - it dries quick, and bonds on glass, wood, tile, concrete, plastic, terracotta, and more. A lot of mosaic artists prefer it for Glass on Glass (GOG) work.
Be sure to read the labels and know that it will adhere your materials and not damage any of them. Engineered backers frequently have a polymer core that will be damaged by a variety of ethyl compounds. Acrylics may be made cloudy with solvent-based adhesives. So research and experiment.
There are lots more in the market - try them for yourself and you’ll figure out what works best for you.
A mosaic rock can really decorate your garden. Try adding them in a pot, putting them on the ground around your plants, or they even serve as a great door-stop. Wherever you put them, they really add a beautiful decorative flavor to your home. And, they are fun to make -- either for yourself, in a classroom, or give as gifts.
Mosaicing a rock involves creating a decorative surface by arranging small pieces of tile, glass or stone to form a pattern or design. Here are the steps to follow to mosaic a rock:
With these general steps, you can create a beautiful and unique piece of art for your garden and others! For more inspiration, check out our Pinterest Board here for some other artists' creative mosaic rocks
]]>Flow, or the laying out of your tiles, is very important to the design. Some terms you should be aware of: Andamento and Opus. Andamento refers to the flow and direction of your rows of tesserae. Opus refers to the actual pattern of the tesserae. These are important because they affect the movement of your tesserae and impacts your entire mosaic. There are many more tile-laying techniques which you can research more if you like.
3 common ways to lay tiles (Opus)
1. Opus Regulatum – grid – all rows aligned - good for creating background patterns
2.Opus Tessellatum – brick laying pattern with each row being offset – helps from obscuring the design – keeps background from overpowering the design
3.Opus vermiculatum – laying a winding manner
Third, color is a very important consideration for your design. When choosing colors, it helps to lay them out beside each other so you can see how well they work together. Contrasting colors tend to intensify each other so experiment with different colors until you find something that works for your project. Using a color wheel can help you make your decision too.
Next, simple, simple, simple. Keep your design as simple as possible by eliminating unnecessary and confusing details. Simpler is better; as you are working with lots of small pieces to create one image, you need to let your viewer easily see what you are trying to convey. Too many small puzzling details will detract. Some of my favorite mosaics by other artists have very simple designs.
Lastly, the pattern. If you want to use a pattern, and if you're like me and can't draw very well, you can either use free patterns or use a software application like Photoshop to create your own design. If you don't have your own printer, office supply stores can print them for you.
I hope this overview helps you create mosaics easier and more satisfying. Have fun in the process!
]]>
The Direct Method:
Using the direct method means adhering your tesserae (tiles, glass, etc.) directly onto the base (or substrate) you are mosaicing to. I enjoy working this way because you can see the design taking shape right away and can correct where needed. If you create a 3-D mosaic, you will use the direct method. Here is my grandson using the direct method on a sun Skeewbacker.
The Indirect Method:
The indirect method is also sometimes referred to as the reverse method, and is a little more complicated than the direct method.
This is a project done by Jennie Grover - an art project for Schools in London. I am sharing this as it is a great example of how to do an indirect method. Her website is: https://jenniegrover.com/
For the indirect method, you will start with a pattern that is drawn in reverse. You will temporarily place your pieces, face down (or upside down), to a surface such as heavy brown paper that has been coated with a glue that is water soluble. You will be basically working with a mirror image.
After you finish placing your tiles and it is dry, the entire mosaic can be flipped over and the back side of the tiles put into a bed of thinset or mortar.
After the mortar dries, the paper is then soaked away from the top of the tiles and you will see your design. You can then clean and grout as needed.
The main reason for using the indirect method is if you have varying depths of tesserae, the larger more uneven pieces will bury down into the adhesive, leaving a smooth top surface. This is important for floor mosaics and tabletops where you need your surface perfectly smooth.
After all your hard work, you've now noticed cracks in the grout. What happened? What is going on? This is very frustrating and is a common problem.
Here's some ideas that may help you figure out why this is happening so you can avoid it in the future.
- When grout cracks appear in a mosaic, it usually is a result of weak grout structure, like having too much water in your grout.
- Sometimes air pockets can form in the grout when there is too much water or additives and if the grout dries with these air pockets in it, then it can lead to cracks.
- Also, if your grout dries out too quickly (you live in a very hot climate), then cracks can appear.
- If you've created a large mosaic (like say on a wall) and see cracks primarily in the grout joints, it could be due to some movement in the structure, like settling, or expansion and contraction of your materials. Temperature changes can affect this as well.
- Another problem could be introducing water to the grout before it fully dries and sets. This would weaken it, causing it to degrade fast.
- Make sure you apply the grout correctly as well. Press your grout firmly into the cracks between your tiles so you don't have any gaps. Grout needs plenty of time to cure properly and strengthen.
Be sure you read and follow the manufacturer's directions on your bags of grout and use fresh grout - as it can get old.
]]>For larger mosaic projects and mosaic commissions that cover more than about 5 square feet, this technique is what you will use to mix your grout. It is very different than mixing small batches. It covers tools, supplies and technique.
]]>
How to shape small areas with a grinder is easy if you know the trick! See how it's done! Get the grinder head at Skeew.biz under Tools and for Nick's Grinder Mate, you can get it on Amazon or at other mosaic supply stores - just google it.
]]>I call this process DDM: Design, Display & Materials. If you use this process, you’ll be able to pick the right backer, adhesive, materials, and display options.
Always try to start with your Design. Your design decisions help refine your display decisions and they in turn, refine your material decisions.
So I created a visual to help explain how decisions flow through from beginning to end. Think of it sort of like a “sifter” – where you put lots of ideas in and then they will filter down while you are making certain decisions along the way.
Let’s run through 3 examples.
The top tray is where your Design ideas go – some possibilities could be a design for a functional mosaic, or a 3-Dimensional mosaic, or 2D mosaic.
Let’s say for Functional we are making a mosaic trivet - for the 2 Dimensional let’s do a name sign - for 3 Dimensional we’ll mosaic a fishing hat.
Now your 3 Design decisions have refined your display decisions.
On your functional trivet – you want to display it indoors, in your kitchen or dining room table.
The 3D fishing hat will be displayed indoors on a shelf or in a display stand.
The 2D name sign will be installed outside on the wall.
Now these Display decisions help to refine your Material decisions.
What exactly are your Material decisions? This is where you need to know which backer goes with which adhesive and which tesserae works with the design, the backer, the adhesives and the display area or environment it will be in.
So for the functional Trivet that is going on your kitchen counter, you’ll want to choose a backer that is waterproof since spills can occur. So a foam core backer will work well. Your tesserae may need to be ceramic since you will put hot pots on it; your glue will need to withstand moisture as well, so thinset is a good choice.
For your indoor fishing hat, material decisions may be to buy a cotton hat that you will put coats of thinset on. Then your tesserae will need to go around the circular hat and into small areas, so you will need small tiles or stained glass to go around the contours. You can use weldbond or something similar to glue your tiles to the hat, since it is an indoor piece. And sanded grout works well. Skeewpicks work well to clean and detail small areas.
And then for your 2-dimensional outdoor name plaque, you need to use the appropriate hanging system to accommodate the weight of your piece, so you may want to use a very lightweight backer which is also weatherproof since it’s going outdoors. So foam core boards may be your best choice. Also consider the size, because if it is really large, you may need to plan how to manipulate it in your studio. You might have to section it or even transport it. And, again, to match the right adhesive to the environment, thinset may be your best choice. Think about your tesserae choices and how they fit with the environment, the backer and the adhesive. A good tile for this could be vitreous tile and there are many more that would work well.
Now, the final step is to look at what your choices have all shaken out to be and then start your project. But, what if you don’t know what all your substrate and adhesive choices are?
This is where the Book on Mosaic Backers can help. This book is a compilation of some of the different mosaic backers that I have used throughout my many years as a mosaic artist. I have also researched different adhesives and what they will bond to and included them in this list.
What you’ll find in here is a comprehensive list of 33 backers that I categorized into 8 groups. I talk about their common uses, how to cut and shape them, what surface preparation is needed, what adhesives work with it, and details about the weight and grouting you might need to know.
So, before you get too excited and just jump in and start a project, try having a well developed vision of a mosaic before you begin. DDM is a good process that will help you do this and will help you make the critical decisions before you start.
]]>I love glass! I have always loved using stained glass for projects because there is such a wonderful variety in the colors, swirls, texture, patterns, and when you flip a piece of stained glass over, surprise! There's more! Glass works so well in mosaics, but you need to know how to cut it so you get the right kind of results.
First and foremost, I cannot stress safety enough. Glass can cut you, but this doesn't mean you have to be intimidated by it. When you are cutting glass or grinding glass, please wear safety goggles. Also, there are thick rubber gloves you can buy very inexpensively for when you are handling larger pieces of glass.
Hold the cutter in your writing hand and starting at the bottom of the glass, apply steady pressure and slide your way to the top of the glass making a score on the glass. You should be able to hear the glass being scored as you go. It sounds like a scraping sound. Once you start, do NOT stop in the middle or lift your cutter until you reach the opposite side of the glass.
After you make your score, use running pliers to complete the break. On the head of your running pliers is a line; be sure to line this up with your score and then gently squeeze until the glass breaks. If you are cutting curves, you will have to make several scores to reach the results you desire. Note: You cannot cut 90 degree angles with hand tools!
Download my free EBook entitled, "How to Cut Stained Glass," and you will learn how to cut 6 different cuts: straight cut, circles, ovals, inside curves, outside curves and s-shapes. Also included are helpful practice patterns you can print out and use to perfect the art of cutting stained glass. Get it here.
The recorded webinar "How to Put the Beauty of Stained Glass to Your Mosaics" demonstrates in detail how to use these hand tools for cutting glass. Take this 1-hour recorded Webinar.
]]>To mosaic a sky can be daunting as it requires a mosaic artist to simplify an already complex subject, with a limited color pallet. This is not a step-by-step of how to do it; rather I want to share some important elements that you should consider in your next mosaic sky project and show you other mosaic artists’ interpretations of sky. 5 elements that a sky can contain are: 1) gradation; 2) perspective; 3) light; 4) colors; and 5) shadows.
The term "gradation" means a minute change from one shade, tone, or color to another. Skies are lighter at the horizon and darker at the top. So color gradation is crucial to depict in skies and Michael Graham executes it superbly here. Also, Michael stated, "reducing the size of the tesserae towards the horizon also helps achieve a sense of depth/perspective."
Perspective is challenging because there are rarely straight lines in the sky and clouds are never uniform in shape and pattern. Clouds close to the horizon will generally appear smaller and further away, larger. Manrico Bertilotti’s mosaic demonstrates perspective and gradation beautifully.
Light is another important element. Clouds reflect the light in the sky, so use colors you see in reflections and light to add depth and greater realism like Felicity Ball did in her sailboat mosaic.
Colors - Really look at the sky and see what colors are there. A rainy day can often have gray, green and even yellow tinges to it. A sunset is often much darker and can contain all kinds of deep reds, pinks, yellows and purples. Also, remember that the closer to the light source (the sun) the warmer the color; the further from the light source, the cooler the color. So don't be afraid to use color like Terry Wright has wonderfully done below.
Here is a great example of different cloud shapes and shadows by Steve Burnett.
Lisa Beary Howell used different tonal values in her sky tiles which flows perfectly with the theme of her church mosaic.
Terry Nicholls demonstrates an awesome ability to show dramatic movement and mood in his sky in this mosaic through the use of colors and andamento - the flow and direction he places his tiles.
Shadows: Add shadows in it to give a sense of space and depth. The more moisture in the air, the more reflections — and, as a result, the more color — you will find. Even when the sky is clear there is a sense of depth perception to our field of vision. In every case, question how that occurs and try to accentuate it with shadows and colors like Mary Driver does here.
I hope you'll consider the 5 elements discussed above and that you'll be inspired by studying these other artist's works.
(All images are shown with artist's permission. Please do not copy. Be inspired.)
]]>This project is a stained glass Calla Lily on a clear acrylic that I will hang in the window. I found a pattern and cut all my glass pieces to fit in the shape of the calla lily.
I use my Gryphette Grinder a lot when doing projects like this in order to get smooth edges and since I like to lay my pieces close together, grinding them helps ensure a good fit between my pieces. I also use my Leponitts to remove extra glass, but this leaves jagged edges, so my grinder quickly takes care of that.
Now that I have smoothed all the edges, I put my pattern under my backer, and position all my glass pieces onto it to make sure they will fit where I want them to be.
Technique #1 – Applying Adhesive to Acrylics
I have set aside all the pieces and I at this time, I used GE Silicone glue. Now I am using Gorilla glue's clear, no foam adhesive, and an applicator to spread the glue over the areas that my glass will go on. I switched as Gorilla Glue works better for me. Then I place each piece onto the backer and press down to get a good, solid coverage of glue on them.
I then used my Leponitt wheeled cutters and nipped clear, green glass for my background and here is the piece with all the background glued down with Gorilla glue's clear, no-foam adhesive.
Technique #2 – How to Stop Grout Bleed
Grout bleed can be very frustrating after you've worked so hard to create a beautiful glass-on-glass mosaic. Here is an example:
To help stop grout from seeping under your glass, you need to make sure you get your glue all the way to the edges of your glass. But sometimes this doesn't always happen. So a good remedy for that is to use a Weld Bond Wash.
To make your weld bond wash, mix ½ water and ½ weld bond and I like to paint it on. I give it a good, generous coat and then wipe off the tops of the glass. You can see below where some of the weld bond wash ran under my glass even though I tried to coat all my glass.
A trick I used was to put it in my oven for a few minutes on a very low heat and this helped dry it up quicker.
After it had all dried clear, I used a gray grout. A trick I discovered in cleaning up my piece was to put it on my lightbox. This really allowed me to see where I needed to wipe and where to use my Skeewpicks to get rid of unwanted grout and glue.
Join me in my one-hour Live Webinar entitled GOG Mosaic Techniques for Tiffany-Style Glass Art and learn more about GOG/GOA techniques!
Here's one final tip. Join the Facebook group GOG Mosaics (glass on glass) to see what and how other artists are making art similar to this.
Tiffany mastered the art of creating stained glass that imitates life. Today's stained glass offers so many color variations and textures, it is amazing. So in order to imitate real life in your mosaics, you need a tesserae that gives you different lighting conditions. Then, you need to know how to not only choose the right glass, but the right parts of stained glass, to achieve the color variations, textures, lights, darks, movement, etc., that is so perfect for your mosaics.
This project was inspired by Tiffany. I am using an acrylic rectangle piece for my backer and gluing all my pieces down with Gorilla Glue clear, no foam adhesive, which dries very clear. This project calls for some unique glass and glass placement and manipulation of grout, which I describe below in Techniques 1 and 2. Gorilla Glue works well on acrylic - but not on glass, so be aware it can crack glass as it sometimes contracts.
Technique 1: Choosing Glass
I choose a sheet of stained glass by first looking for one that has a lot "going on" and what I mean by this is, I want a lot of wispy, light, and dark colors running through the sheet and sometimes I prefer one with textures. Then I am able to choose the particular part of the glass that has the precise characteristics I want for individual elements in my mosaics. Of course this all depends on your pattern. For instance, I wanted my flower petals to have different hues, so I selected areas in the glass that offered different tonal values like this:
For achieving dimension, I use darker glass for backgrounds, imitating depth and shadows. So for this project, I chose different greens, as the lighter ones come forward, the darker ones move to the back.
Technique 2: Manipulating Grout
I like to place my GOG pieces real close together because when it is backlit, your shapes will be clearly seen. When you grout your piece, it fills in all the spaces you have left open, and can sometimes block the light and misrepresent the shape you intended. Here is an example. Below is what I intended – a rounded loop in the vine:
Below is an example of what happens when you don't place pieces close enough. You can see how the grout filled in around my triangles and changed my rounded area to a square.
Here I intentionally left gaps between pieces so the grout would fill in and become "outlines" in areas I wanted like between the leaves.
So it is very important to choose the right glass and use those special areas of the glass for elements of your mosaics. Take advantage of all the wonderful textures, colors, swirls, lights and dark streaks that are available to us in stained glass sheets. And remember, grout is your friend, so use it to your advantage!
Turning simple objects into mosaic backers is really a lot of fun. My first experience with this was my "Gone Fishing" hat. I bought a cotton fishing hat and made it into a hard base to mosaic on. Now I've decided to create two other different backers using a towel.
First and most importantly, since you will be mixing powdered thinset, I recommend you use a dust mask and work in a very well ventilated room. You might also consider wearing gloves, but if you don't, know that thinset is a drying agent for your skin, so just wash your hands frequently and apply hand lotion and you'll be fine.
I chose 2 terrycloth white towels to be mosaic bases. Then I set up my workspace by putting down brown paper and then a board over it, knowing this is a very messy project and the board and paper will be tossed out when done. The board is a good surface to work on, as you will be manipulating the towel and need a sturdy surface.
Next, you'll need to have white thinset (or you can use gray), a water supply and a large enough bowl to submerge your towel in.
Mix up your thinset by first putting a little water in the bottom of your bowl and then add your thinset powder. The consistency you want is like the consistency of paint – we want it thinner than usual so you can spread it easier and so that the towel soaks it up as well. A little wooden stick is a good mixing tool. Keep adding water and powder until you have the consistency you want.
When your thinset is ready, completely submerge your towel into the thinset. Then lay it out flat on the board and either use your hand or a paint brush to smooth in more thinset in areas that need more thinset. Completely cover in thinset and then flip over and cover the back side as well.
Now the fun part – sculpting. On the front side, using your hands, start pulling in the towel in those areas that you want to create your sculpture with. I cut a plastic cup in half and put it under the towel to add height to the sculpture. You can use whatever objects you want – be creative.
Important note: Keep in mind that you will be cutting and gluing small tesserae in all these nooks and crannies, so don't create something impossible to mosaic on; try to make your creases as vertical as possible and avoid any "under-cuts" where it would be impossible to place your tesserae.
I wanted to show another example of how versatile this technique can be, so I grabbed another towel, mixed up gray thinset, and put a larger plastic bowl underneath. The shapes you can create are limitless.
Now, after you finish the first coat on the front and back, let it dry overnight. This is your foundation and should be thoroughly dry before you resume more coats.
I recommend you do at least 4 coats, letting it dry in between each one – usually 2 hours is a good amount of time between coats. You can do more coats if needed. For the remaining coats, mix your thinset a little thinner. You may even want to pour some on, so that it coats evenly across all the areas. Let thoroughly dry. Coat again.
Immediately after the last coat, and before it is dry, you will want to start smoothing the thinset so you have a nice surface for your tesserae. Use your paintbrush or sometimes fingers work the best for smoothing it all out.
When you have achieved a nice surface and everything is dry, take a medium grit sandpaper and lightly sand where there may still be rough areas. Thinset is dusty when it is dry, so this is probably a job for outside. Remember your dust mask. After you have a smooth surface that you are happy with, you can take a damp cloth and lightly remove any dust, then you are ready to mosaic. You can use WeldBond or thinset as your adhesive as well as others that are appropriate for your project.
We are pleased to have Staci Edwards as a guest writer. She is sharing her surprising technique for making mosaics in the reverse method. This is her step-by-step process. To see more of Staci's mosaic art, visit her website Collidescopes.
So first off, I have seen on other blogs when the artist uses a product there is a little statement about endorsements and money and other icky things. So I am just letting you know, I am not getting paid by anybody, I just LOVE this product. The company was asking for tips and here is mine!
I use QuikStik mesh from Skeew Mosaics all the time.
It's sticky, and it's mesh! I like it because I work pretty instinctually–I don't use patterns, I just draw and go. The sticky mesh makes that very easy for me.
One problem I run into is what happens with transparent glass. I can see the mesh through it, and I don't want to have it marring the beauty of the glass. But I also don't want to try to place an intricate design down into wet mortar, piece by piece, and then have it not line up.
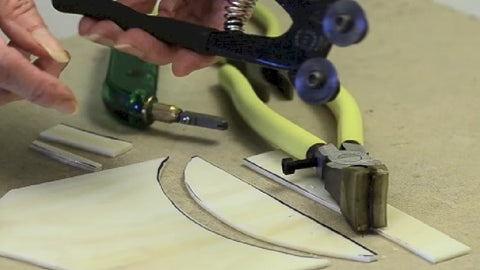
For example, I created this sea anemone for my large scale wall mosaic. Lots of transparent pieces, complicated design to transfer.
This is how I get around the issue–it's a few more steps–but for me, worth it to not have to deal with patterns or numbering glass bits. Here the mesh is underneath–it allows me to work on it and move it around easily. I put the design down on a piece of cardboard. (I realize this is a strange shape. But there are things that are attached to other things on this project that haven't been completed so sometimes I have to get creative on how I mortar my art down.)
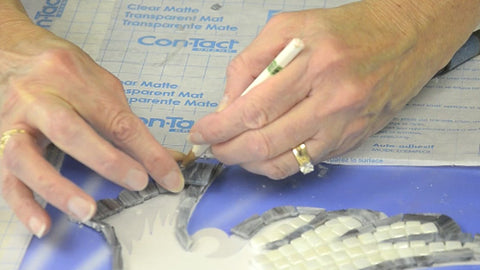
Then, I put another section of QuikStik mesh on the top of the piece. Then I sandwich it with a second sheet of cardboard (white).
Then I flip the whole thing over! (The white cardboard is on the bottom now.)
My design is now in reverse. I peel OFF the mesh that used to be on the underside, that is now on the top. I work carefully–some smaller pieces might come up, and I just reposition them. Then I press down firmly to make sure the tesserae are attached to the new mesh.
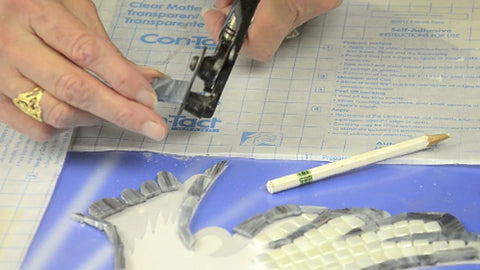
I cover it with cardboard and flip again!
Now I have the design back in it's original position, right side up, only with the mesh ON TOP OF the mosaic.
I lift it carefully to make sure everybody is still attached. Good to go!
I mix the mortar a little on the dry side. Soupy mortar is a mess to clean up when it oozes out from under the tesserae!
I apply my mortar in it's goofy shape and then I lay the design in carefully.
It's kinda like sliding a pizza off a tray–I just pull the cardboard away slowly as I guide the mosaic in to place. I start in an area that fits together like a puzzle to help me line it up correctly.
I press gently and evenly–I don't want to create a lot of oozing up between my bits and pieces, but I definitely want to make sure the mortar has got everything!
Then I carefully peel off the mesh. I do this while it is wet, because I like to make sure my joints are clean, to be ready for grout, before the mortar dries.
I might have one or two that come up with the mesh, I just reposition them where they are supposed to be.
I use a float to gently even out the surface, then work on the grout joints. Mortar that is up too high between the tesserae will pop up through my grout.
Resist the urge to clean the horizontal surface while the mortar is wet. You just end up moving your tesserae around. It comes off the surface of the glass easily later with a little water.
Then I make sure my edges are super clean so that the next section will butt up against it nicely.
All done and ready for the next section…when I get to it!
I hope that this helps. Understand that with opaque glass it is just as easy as: set your pieces, mortar, clean your grout spaces and go.
I highly recommend this product. I have done mosaics for years and felt frustrated transferring my design to the mortar and not having it fit the way I intended. This product allows me to spend more time playing, AND helps me preserve the work I just created when I install it.
]]>
Mirror is a great material for mosaics - its reflectivity adds such a great element. But cutting mirror is a little tricky. You need to be deliberate and careful. A very talented stained glass artist is kindly allowing me to share this information with you. You will need to use stained glass tools such as a scoring tool and running pliers and possibly a glass grinder.
Here are some great tips:
It’s very easy to chip the backing when you run the score. To minimize this, do the following:
Grinding Mirrors
Important note: Only use glues that are specifically for mirror like Loctite Mirror Adhesive. Other glues can and will "eat away" the silver backing.
This information was originally shared from Milly Frances, Stained glass artist, at https://everythingstainedglass.com - she has lots more stained glass info there.
]]>When creating a mosaic, there are areas you will need to pay special attention to in order to get the right fit as well as the right shape.
Here's a project I created where I needed to transform square tiles into dove feathers. They needed to be small, tight fitting, smooth pieces.
I was working over a pattern so I used 3/4" vitreous tiles to create each tail feather. The steps I took are noted below:
Step 1 – The first thing I do is I hold each tile over the area I want it to fit into so I can "eyeball" the size and shape I want it to be.
Step 2 – The second step is to mark right on your tile where you need to cut it. I like to use Stabilo pencils to mark on my glass. They come in different colors so you have color choices depending on the color of your glass. In this case, I used white to mark on my dark gray tiles.
Step 3 - Use your nippers and cut away the glass you don't need. You may need to nibble away some of the glass to get those tiny areas to fit.
Step 4 - Check to see if your piece will fit. If you need more glass removed, make those additional cuts with your nippers.
Step 5 - My final step before gluing the tile down is to use my glass grinder to smooth the edges for a really nice, detailed look.
Now you're ready to glue your piece down into place. This process is very easy and works great if you follow these steps. Practice eyeballing each piece for that great fit and if you can't get it right the first time, just grab another tile and start again. You'll be much happier with your end result if you take your time and get it right!
I have always loved working with glass so coming from a stained glass background has been an advantage for me in my mosaic art. A lot of the tools I use in Mosaics I can also used in Stained Glass. I want to share with you a tool that I think is a "Must Have" for mosaic artists who need to achieve a smooth edge to their tesserae. I'm talking about a grinder. It is a tool I use on a regular basis and is so easy and fast.
First, safety always needs to be your top priority, so always wear some kind of eye protection. You never know when that small little piece will fly up in your face while you are grinding, so always wear glasses.
First, Grinders come with diamond grinder bits that have different grits for working on diverse ranges of tesserae. You can grind glass, stained glass, ceramic tile, porcelain, stone, slate, limestone, marble, and granite. You just need to order the right grinding heads that work best for the materials that you will be using. I generally stick with 2 diamond bits: one that has a grits of 100-120 which works really well for smoothing and shaping and the other is 170 grit which is best for stained glass and glass tile tesserae I generally use.
NippinSquares are a great addition to your tesserae and are easy to smooth with a grinder. Use a 170 grit bit for stained glass to prevent chipping.
The other important thing is that grinders have cooling systems that applies water to the grinding head for cooling and lubrication. Never grind your tesserae without water in the reservoir as you will wear out your bit really fast and it will kick up dust from your tiles; using water controls all that dust. So fill up your reservoir and I recommend purchasing a bottle of grinder coolant and add a capful right into your water in the reservoir whenever you change out your water. The coolant provides a smoother grind and extends the life of your grinder's diamond heads.
Now for the fun part.
Once you have cut out a piece of tesserae, there will be sharp edges so always be careful when handling it and, again, wear your glasses. If you want you can buy some inexpensive gloves to wear while grinding.
Place your fingers on top of the tesserae, hold it firmly and press gently against the bit. Move the tesserae back and forth – never hold your piece in one place, unless you are specifically wanting to remove a significant amount in one area. So, moving it back and forth will give you smooth lines and removes any sharp edges. A Grinder's Mate and/or a Grinder Cookie are two helpful tools that will hold really tiny pieces of glass that you need to grind smooth. You can get them from a variety of online stores selling grinder accessories.
After you have the desired smoothness, wipe off with a dry clean cloth. You're ready to use your piece in your mosaic! So simple and easy and you'll be glad you have a grinder.
NippinSquares are a great addition to your tesserae and are easy to smooth with a grinder. Use a 170 grit bit for stained glass to prevent chipping.
]]>Wedi board is a German product normally used in the construction industry as an underlayment for bathrooms, showers, floors, anywhere that needs waterproof material. It is a foam board covered with a thin layer of fiberglass mesh and a cement coating. It is entirely waterproof and weatherproof, very rigid so it won't warp, and light weight. There is a hanging system you can install if you want to hang it on a wall.
Skeewbackers are very similar to Wedi boards, only they are made in the USA by Laticrete (hydroban boards) and are also used in the construction industry as an underlayment for bathrooms, showers, floors, anywhere that needs waterproof material. It has a high-density, waterproof extruded polystyrene cord with a reinforced, waterproof membrane on both sides to give triple protection from water and vapor intrusion. It is also rigid, lighter weight than Wedi board and has a hanging system that is easy to install.
The description straight from Laticrete: "HYDRO BAN Board® is a lightweight easy to handle and ready to tile wall board designed to be used in bonded tile or stone installations. It is made with a high-density, waterproof extruded polystyrene core and a reinforced, waterproof membrane on both sides to give triple protection from water and vapor intrusion. Available in a variety of thicknesses from 1⁄4” to 2” (6 mm to 50 mm) the HYDRO BAN Board can be used on walls, floors, ceilings, and in many installations requiring dimensionally sound and stable substrates as well as in steam rooms and steam showers. HYDRO BAN Board does not contain cement, fiberglass or paper products and will not cause itching or create messy cement debris during installation. No tab washers are required for floor and wall installations when using the ceramic coated HYDRO BAN Board Screws."
Here's what is great about both of them. You can create address plaques, decorative wall art, and anything else your imagination can come up with. You can use it indoor or outdoor. For mosaic artists, it is a great alternative to the heavy cement boards and heavy wood and you don't have to worry about expensive framing.
Remove any fibers from the edges of the Wedi board – Skeewbackers have no fibers so this is not a necessary step
These backers provide a great option for mosaic artists as they are designed for all environments – wet and dry. They are also very light weight and can be cut easily with a utility knife or jig saw.
The main differences between Skeewbackers and Wedi board are that Skeewbackers are lighter in weight than Wedi board and do not have any cement or fiber coating, so they are actually cleaner and easier to use. The corners on Skeewbackers do not crack or break like Wedi board corners. I think you’ll find Skeewbackers the superior product.
"Creativity is contagious, pass it on" – Albert Einstein
This is a wonderful quote that I hope everyone of us will embrace with our children and our grandchildren.
As a professional mosaic artist, I've worked with all ages of children over the years creating large mosaic installations. My most recent was with middle school children where we created a large mosaic of their school's logo, a falcon, onto the wall of their cafeteria using vitreous tiles. It was immensely enjoyable for me and when it was all finished, the children were ecstatic that they were able to leave behind a legacy at their school.
It is very important to spend time with our children and grandchildren and nurture their creativity. As Einstein says, we need to "pass it on." Sometimes, as adults, we find it difficult to find the time, energy or commitment to do this. Here's another thought-provoking quote:
"Every child is an artist, the problem is staying an artist when you grow up" – Pablo Picasso
Here are 7 tips to help you pass on your mosaic creativity.
When it gets right down to it, the process is more important than the resulting project. You don't have to be a great artist to have great art experiences with your children/grandchildren. Don't get hung up with trying to create a great mosaic, just enjoy the time you spend together and know that they will have great memories of your time together to look back on when they are grown.
One of the many wonderful characteristics of mosaics is their durability. Who knows how many generations can enjoy the art made from glass, china, ceramic, and stone tesserae? We do know that we can easily find mosaics that are 1,000 years older than the oldest paintings.
Choosing the right substrate for your mosaic is critical to its longevity. A mosaic that may get wet should be on a moisture resistant or waterproof backer. Cement board has been around the longest and may thereby be best known, but Skeewbackers are becoming widely recognized as a much better solution even better than Wedi board.
Yet there are still a lot of questions about how they compare. So we set out to find and report on the differences. But first, there are similarities. They are all:
Here are the differences:
Construction - Cement board is a combination of cement and reinforcing fibers formed into sheets of 3 feet by 5 feet or 4 feet by 8 feet.
Wedi is made with a dense polystyrene foam core sandwiched between thin layers of concrete which are reinforced with fiberglass mesh. The fiberglass mesh sticks out beyond the board and can be difficult to trim.
Skeewbackers are similar to wedi board with a high-density, waterproof extruded polystyrene core but they have a reinforced, waterproof membrane on both sides to give triple protection from water and vapor intrusion. No cement dust, no fiberglass mesh issues. Straight from the manufacturer: "HYDRO BAN Board® is a lightweight easy to handle and ready to tile wall board designed to be used in bonded tile or stone installations. It is made with a high-density, waterproof extruded polystyrene core and a reinforced, waterproof membrane on both sides to give triple protection from water and vapor intrusion. Available in a variety of thicknesses from 1⁄4” to 2” (6 mm to 50 mm) the HYDRO BAN Board can be used on walls, floors, ceilings, and in many installations requiring dimensionally sound and stable substrates as well as in steam rooms and steam showers. HYDRO BAN Board does not contain cement, fiberglass or paper products and will not cause itching or create messy cement debris during installation. No tab washers are required for floor and wall installations when using the ceramic coated HYDRO BAN Board Screws."
Weight - One square foot of ½ inch thick cement board weighs 40 ounces, wedi is 11 ounces, and Skeewbackers are the lightest at 5 ounces.
Water tightness – Cement board is water and mold resistant and Skeewbackers and Wedi is waterproof.
Shape - Cement board is not shapeable. Skeewbackers and Wedi can be shaped but wedi board has a cement and fiber coating that makes scoring tricky as it can crack and break. Skeewbackers cut and shape cleanly with no cracking or fibers.
Dimensions – Cement board is available in sheets with a thicknesses of 1/2 and 5/8 inch; widths of either 3 feet or 4 feet; and lengths of either 5 feet or 8 feet. Skeewbackers are available in ¼” and ½” and more thicknesses and lots of sizes and shapes as well as large panels. Wedi is available in sheets or panels with thicknesses 1/8, 1/4, 1/2, and more up to 4 inches; widths of 6 to 24 inches; and lengths of 6 to 24 inches.
Availability – Cement board is only available from building material suppliers and must be picked up at the store. Skeewbackers are available at Skeew.biz and are shipped worldwide. Wedi is also available online from mosaic supplies websites and may be available in local stores.
Cost – there is a large difference in their cost. Skeewbackers and Wedi board cost more than cement board, but the advantages outweigh cement board hands-down.
It is my opinion in working with all of the above backers, that foam-core backers provide the best option for mosaic backers and Skeewbackers are my favorite due to their lightness, ease of cutting, very clean edges.
This is a stained glass shower mosaic I created several years ago. Since then, new and improved materials have become available that would have made this project quicker, safer and more fun. So let’s see how some things have changed.
The cement board I used for wet areas was very, very heavy. When you added your mosaic and adhesives, it really got heavy. Also, cutting it was very difficult as well. The heavy weight made it a nightmare to install. Now I would absolutely use the Skeewbacker hydroban boards because they are so lightweight, easy to cut and easy to install with the simple hanging systems that work well with them.
I used the cheap, dental tools that had the rough ridges on the handles and boy, I sure worked up sore spots and blisters on my fingers. Skeewpicks sure would have been nice as their handles are coated in a cushiony cover and there are several blade shapes to choose from for the cleaning and detailing.
The first fiberglass mesh I worked with involved having to tape down clear seran wrap over your pattern, then tape down the mesh over that. Then you used thin set on every piece you placed onto it and this meant you better be sure you like it right away. Otherwise, removing it after it dried was time consuming, messy and frustrating. Now I use QuikStik Mosaic Mesh because you don’t have to use any glue at all until you are finished with placing all your tiles. The glue only goes onto your backer and you lay the tiled mesh into it. During the tiling process, you can pick up and move around tiles easily so that you get it just the way you want it.
It’s fun to look back and appreciate the advances we have made in our mosaic processes. These are just a few and I hope they give you ideas on ways to work better, cleaner and faster. What are some of your favorite old vs new methods and materials?
Grinder bits come in different grits. How do you know which grit will work best for you? Here's some good information about which bit you should use for your project.
The standard grinder bit that usually comes with your new grinder, is 100/120 grit. It is good for shaping tile, glass, stone, porcelain, bone, antler, etc., most any dense mineral-based material. It does; however, produce some chipping on the edges of stained glass, and for harder surface could keep smooth surfaces but be a little too slow.
A speed bit or production grinding head is 60 grit and is used for ripping through especially hard materials, like stone, a little faster than the standard bit. The finished edge will be rough, so you might start with this bit to remove a lot of material, then finish with a finer grit bit.
The medium 170 grit bit is favored by many mosaic artists to shape and take off the sharp edges of their glass pieces. This is my preferred bit since I use a lot of stained glass in my projects.
NippinSquares are a great addition to your tesserae and are easy to smooth with a grinder. Use a 170 grit bit for stained glass to prevent chipping.
The fine 220 grit bit is best for very thin or delicate glass, such as dichroic and iridized coated glass. Again, it is smoother and doesn't cause the chipping that we often see with a standard grit bit on these types of glass.
An ultra-fine 600 grit bit is also called a mirror bit and would be most appropriate for smoothing the edges of mirror. It doesn't polish the glass, it still looks cloudy, but it is very smooth to the touch.
And, there are jewelry bits that grind a groove into the edges of fused glass or stone cabochons to have a wire wrapped around them so that they can be used as beads or pendants in making jewelry.
If you're considering adding a grinder to your mosaic tools, I highly recommend you also decide what grinder bit will work the best for you and that you order it with your grinder. That way you'll be on your way to creating a wonderful mosaic!
]]>Did you know? Here is an assortment of tips that I have collected over the years when working in mosaics, working with mosaic teachers and students. There might be some you haven't heard of.
These are just a few tips and tricks – I encourage you to share your tips and tricks with other mosaic artists. That's how we all learn!
]]>This blog post will not give you a "magical" way to price your work. There is no hard and fast rule, unfortunately. There are many variables that play into how you price your work, so I will talk about how to know what your minimum baseline is. It's a starting place.
Pricing your work is truly a challenging quest. The variables are many, as I mentioned above, and here's a few that are important for you to consider:
Knowing your market is essential. Here in Florida (except for a couple small pockets in south Florida), mosaics do not have the appreciation or value as it does in other states like New York and California. Being aware of this is critical for making the right decisions, avoiding disappointment and having unmet expectations. Knowing your minimum baseline probably helps more for commissioned work than it does for speculative work. If you know of a good gallerist, they can be a good guide in helping you set a price for your work.
So, here's a good formula to establish a minimum baseline so you will know what you need to charge in order to make a living creating mosaics:
Monthly overhead + monthly lifestyle requirement / #days per month you can produce mosaics (leaving time for marketing, admin, etc.) / 8 hours in a day
For example: Say you need $5,000 per month to meet all your overhead and maintain your lifestyle and you can truly work 3 full days a week just creating mosaics, it would look something like this:
$5,000 divided by 12 (3 days a week x 4 weeks) = $416 daily rate or $52 per hour
Your minimum hourly rate would be $52.00. So if a piece takes 4 hours to make, it should fetch $208 plus material costs PLUS the variables and other factors. Remember, this is just your baseline.
There are additional factors like your personal brand and scarcity. For a living artist, scarcity is the difference in supply and demand. Demand is created by good marketing of the artist and supply is limited by the time the artist has to produce. If you can create demand that would require you to produce 5 days a week and you can only produce 3 days a week, then you have a supply gap and your prices should be higher in this situation. If you have 3 days to produce and you can only sell enough art to use up one of your production days, then you need to market more and create the demand, not lower your price.
So, know your minimum baseline. It's a starting point. Then take into consideration all the other factors and variables around you.
Eyes are the windows to our soul. Creating a mosaic of an animal's eye or a human's eye can be daunting, for sure. It needs to look as real as possible.
Because it is the hardest part of the face to create, I always start with the eyes. If I don't get the eyes right, the rest won't be worth the effort, so that's why I always begin there.
Here are a couple of mosaics I've done where the subject of the mosaic is the animal's eye.
I used photographs to help me create each of these animal eyes. It is very important to pay attention to all the details of the eye – especially the catch light. A catch light is a light source that creates a highlight or reflection in the eye. This highlight adds dimension and depth and brings the eyes to life.
There are two methods I used to create the catch light in these mosaics. In the Zebra mosaic, I cut white glass to create the catch light. The other method I used was choosing curved, dichroic glass for the eyes of the Red Fox. This dichroic glass catches light from the surrounding sources and creates a great effect that way.
Catch lights come in different shapes and sizes because it all depends on the shape and size of the light source as well as the distance from the subject. You can also have more than one catch light, if there is more than one light source. If you follow a photograph, you'll be able to confidently place the catch lights where they should be.
Try adding catch lights to your subject's eyes and be amazed at how life-like they will look!
Shadows are a very important part of replicating life and creating realism. If you are wanting to add this realism or a 3-D effect to your mosaics, you should consider creating shadows where appropriate.
Here are 4 examples where shadows have been creatively used:
Above is a waterlily free-form mosaic I created and went for the dramatic shadows on the right of the lily. They help to create a 3-D effect and make the lily look more real.
Another great example of using shadows is in this mosaic of an angel. This artist used different shades of colors to exemplify the folds in the fabric and in her wings.
One final example of using shadows is this artist depicting a very bright light coming from a manhole, and using dark colors to create shadows behind the bright colors he used for the light (below).
There are 2 types of shadows: cast and core. Cast is a shadow that is being virtually "cast" because the object is blocking the light, therefore, casting a shadow of itself. A core shadow is a shadow on the object itself. You can use core and cast shadows simultaneously as Drostle did on the shaded sides of the coy (core shadow) and on the bottom of the pond beneath each fish (cast shadow).
Creating shadows is somewhat challenging. Dark colored tesserae works well for representing shadowed areas and lighter colored tesserae works well for highlighted areas. You need to first determine where you want your light source to come from. Then, use perspective to create the correct angles, size and shape of your shadows. Plan ahead for incorporating shadows so you can use the right color combinations and perspectives for your shadows.